User:Moxy/Help:Introduction to/All
66 pages
Intros 2 pages
Wikipedia is made by people like you.
This page takes you through a set of tutorials aimed at complete newcomers interested in contributing. It covers all the basics

[[Earth]].

For more training information, see also:
Full help contents page
Training for students
A single-page guide to contributing
A training adventure game
Resources for new editors
How you can contribute

Don't be afraid to edit – Anyone can edit almost every page; just find something that can be improved and make it better! You can add content (using references to support your claims), upload free-to-use images, correct spelling and grammar mistakes, improve prose to make it more readable, or help with any number of other tasks. It's normal for new contributors to feel a little overwhelmed by all of our policies, but don't worry if you don't understand everything at first. It's fine to use common sense as you edit, and if you accidentally make a mistake, another editor can always fix or improve it later. So go ahead, edit an article, and help make Wikipedia the world's best information source!
Suggest improvements – Each article also has a "Talk" page, where you can suggest improvements and corrections to the article.
Sign up for an account
You're welcome to edit without creating an account, but there are many benefits of registering an account. It's quick and free.
Want to try editing?
You can test out how editing feels by editing one of the "sandbox" test pages below:
or or
Just type some text and click Publish page when you're happy with the way it looks. Don't worry about breaking anything; these pages are open areas just for experimentation!
There's plenty more behind the scenes
Wikipedia has many community pages in addition to its articles.
Task Center – List of tasks with which you can help
Help pages – Support and advice
Community portal – The hub for editors
Policies 4 pages
Wikipedia actually has few strict rules, but rather is founded on five fundamental principles. Wikipedia's policies and guidelines are developed by the community to clarify these principles and describe the best way to apply them, resolve conflicts, and otherwise further our goal of creating a free and reliable encyclopedia.

Policies express the fundamental principles of Wikipedia in more detail, and guidelines advise how to apply policies and how to provide general consistency across articles. Formal policies and guidelines have a notice at the top of their pages, and the prefix "Wikipedia:" or "WP:" before their page name.
While there is a policy or guideline for almost every issue imaginable, no one is expected to know all of them! Luckily, there are a handful upon which all others are based. The next few sections describe the most significant of these, representing the general spirit of Wikipedia's rules. Knowing these basics makes discussions and editing easier and more productive.
Wikipedia is an online encyclopedia, and the community constantly strives for accuracy. Articles should be neutral and should contain only verifiable information and opinions that already exist in reliable sources.
 |
Neutral point of view (or NPOV) means that content is written objectively and without bias, merely presenting the facts and notable viewpoints of others. A general-purpose encyclopedia ought not to contain articles that favor particular viewpoints. Striving for a neutral point of view helps prevent articles from becoming advertisements or propaganda.
|
 |
Verifiability means that articles should contain only material that has been published by reliable sources, such as reputable newspapers and scholarly journals. All content should ideally be supported by a citation, but content that is controversial or likely to be challenged will definitely require one! Unsourced material may be removed at any time, and it is the obligation of the editor adding material to provide a reliable source. |
 |
No original research means that articles may not contain previously unpublished arguments, concepts, data, opinions, or theories. This prohibition means that Wikipedia editors' own analysis or synthesis should not be included in articles. Basically, Wikipedia is a record of human knowledge, viewpoints, and summaries that already exist and are expressed elsewhere. |

Writing on Wikipedia is highly collaborative. There are two good starting points for how to get along with other editors: be bold, and be civil.
When editing, be bold! Most edits make the encyclopedia better, and mistakes can always be reverted or corrected. If you see something that can be improved, improve it, and do not be overly concerned with breaking anything. If the change is in the spirit of improvement and makes sense to others, the odds are good that everything will turn out all right and the change will be kept. If not, it's easy for someone to change it back.
Being civil entails remaining polite and assuming good faith when interacting with others, and focusing on the content of edits rather than on personal issues. It requires participating in a respectful and considerate way, without ignoring the positions and conclusions of others. Assuming good faith means that we assume by default that other people's intentions are to improve the project. If criticism or moderation is needed, we discuss editors' actions but do not accuse them of harmful motives without clear evidence.
Editors typically reach consensus as a natural and inherent product of editing; generally, someone makes a change or addition to a page, then everyone who reads it has an opportunity to leave the page as it is or change it. Being reverted may feel a bit deflating, but do not take offense, as it is a common step in finding consensus. If you have a disagreement or suggestion, express it on the article's talk page, and politely discuss the change until a consensus can be reached. Never repeatedly undo another editor's edits; this is called edit warring and is disallowed. As a last resort, you can file a request for help resolving a dispute.
Summary

- Policies define Wikipedia's fundamental principles. Guidelines recommend how to apply them and how to provide general consistency for readers.
- Content – Articles should be neutral and contain only information and opinions that already exist in reliable sources.
- Conduct – Be bold, and be civil. In a disagreement, assume good faith, and civilly discuss issues on talk pages until a consensus can be reached.
More information
You should now have enough of an idea of the spirit of the guidelines and policies to begin editing with some confidence! For more information, check out Wikipedia:Policies and guidelines.
For the next module, you can choose to learn either VisualEditor or Wiki Markup. VisualEditor is intuitive and works like a word processor. Wiki Markup, preferred by most editors, is more versatile and allows you to edit wikicode directly.
Wiki Markup 26 pages
A note about editing on mobile devices: Most Wikipedians prefer to edit from a computer, as the editing interface works better there. You can edit from a mobile device and tablet, though. See this page for more information.

Wikipedia is formatted using its own language called wiki markup, also called wikitext. It's pretty easy to learn the basics.
You have a choice of using one of two editing tools; the "Source Editor" uses wiki markup.

Alternatively, you can use VisualEditor, a secondary editing interface that works more like a WYSIWYG word processor. VisualEditor is somewhat simpler to use, but Source Editor is more effective for some tasks, and is the only one able to be used on Talk Pages. Elsewhere, you can easily switch between the two editing tools, as shown at right.
To view and edit a page using wiki markup, click Edit or Edit source at the top of any page. This will allow you to type text that you want to add, using wiki markup to format the text and to add other elements like images and tables that are explained later in this tutorial.
Wiki markup can initially seem intimidating (especially references) but it actually requires only a few rules to understand and use. These rules are listed under Help ![]() at the top of the Source Editor, and you'll quickly get used to them! You can always test new techniques in your personal "sandbox" page.
at the top of the Source Editor, and you'll quickly get used to them! You can always test new techniques in your personal "sandbox" page.

Most articles actually need very little text formatting.
All formatting is achieved by placing symbols on either side of blocks of text. You can either type the markup manually, or add it through the toolbar at the top of the editing area.
Headings and subheadings can be added by clicking ![]() Advanced then Heading
Advanced then Heading ![]() in the extra toolbar line which now appears.
in the extra toolbar line which now appears.
Selecting "Level 2" will format text as a main heading, the most frequently used subdivision of any page.
"Level 3" gives you a subheading for a Level 2 heading, and so on.
To create a heading without using the toolbar, put text between = signs; the number of = signs on each side of the text indicates the level:
==Heading== (Level 2)
===Subheading=== (Level 3)
Text can be made bold or italic using the B and I buttons on the toolbar.
To create bold or italics without using the toolbar, put text between ' apostrophes; three on each side for bold, or two on each side for italics.
'''bold'''
''italic''
An article's subject should always be written in bold the first time it is mentioned, but not thereafter. For detailed guidance on how and where bold and italic text should be used, see the Manual of Style sections on bold and italic formatting.
Wikilinks are one of the key components of Wikipedia. Wikilinks connect pages to each other, tying the whole encyclopedia together.
In general, wikilinks should be added for the first mention of important or unfamiliar concepts in an article.
Typically, wikilinks use square brackets, like this: [[target page]]. You can also insert them by clicking the ![]() icon.
icon.
If you want to link to an article, but display some other text for the link, you can use a pipe | divider (⇧ Shift+\):
[[target page|display text]]

You can also link to a specific section of a page using a hash #:
[[Target page#Target section|display text]]
Here are some examples:
[[link]]displays as link[[Android (operating system)]]displays as Android (operating system), whereas:[[Android (operating system)|Android]]displays as Android[[Earth#Chemical composition|Chemistry of the Earth]]displays as Chemistry of the Earth
You may also encounter templates, which allow frequently used elements to be included on multiple pages. These are designated by curly brackets like: {{template name|parameters}}
For instance, to insert the [citation needed] tag, you can type this code:
{{Citation needed|date=February 2025}}. The ![]() icon works, too.
icon works, too.
Edit summary (Briefly describe your changes)
![]() This is a minor edit
This is a minor edit ![]() Watch this page
Watch this page
By publishing changes, you agree to the Terms of Use, and you irrevocably agree to release your contribution under the CC BY-SA 4.0 License and the GFDL. You agree that a hyperlink or URL is sufficient attribution under the Creative Commons license.
When you think you're ready to publish (save) your changes, there are a few things to do first.
You should preview your changes to check that your edits look as you intended, by clicking the Show preview button. We all make mistakes, so this step can help you catch them before the article is changed.
Write a short edit summary in the "Edit summary" box to help other editors understand what change you have made and why you've made that change. It is okay for your explanation to be quite short. For example, if you are making a spelling correction, you might just put "fix typo".
If you've made a minor change that should be uncontroversial, such as a spelling or grammar correction, you can check the "☑ This is a minor edit" box. Minor edits are those that do not modify the meaning of a page or make a change that another editor might reasonably dispute.
To add a page to your Watchlist, so that you'll be notified of any further changes, use the "☑ Watch this page" box. You can also watchlist pages by clicking the star at upper right (next to the search box on desktop displays).
Previewed the page? Written an edit summary? Then you are ready for the final step: Click the Publish changes button, and your changes will instantly be uploaded to Wikipedia!

Wikipedia already has 7 million articles, so most of the time you'll likely be updating and improving existing pages. Sometimes, however, you may want to create a completely new article! Before you do so, there are three criteria you need to know:
Notability
Is the topic notable? Topics need to be sufficiently important to be included in Wikipedia. This means that the subject must have received significant coverage in reliable sources that are independent of the subject, such as newspapers, magazines, scholarly journal articles, and books.
Reliable sources
Are there reliable and verifiable sources to back up any claims? Before you start writing an article, you should gather a set of independent, reliable, verifiable sources to cite as references. These are essential for ensuring that the contents of Wikipedia remain accurate, verifiable, and trustworthy.
Conflicts of interest
Do you have a conflict of interest (COI)? It is best to avoid writing articles about yourself, your company, or someone you know personally. This is because it is difficult to avoid bias and achieve a neutral point of view on these topics. Even if you cannot write the article yourself, you can always request that someone else write it and provide them with reliable sources to use.
Where to create a new page
It is typically best to create a new article as a Draft (e.g. "Draft:Example"). This allows you to write and develop your article before it gets moved to Wikipedia's mainspace.
|
|
The Article Creation Wizard will walk you through the steps of creating a new draft article and notify experienced editors to review the article and provide feedback. |
Summary
- Wiki markup is a simple source code language for Wikipedia.
- You can view and edit the source code of almost any page on Wikipedia by clicking "Edit source".
- The Edit toolbar at the top of the page can do some formatting for you.
- The Help
 menu on the Edit toolbar contains a list of markup rules.
 - Format
==Headings==by placing text between=signs. - Make text
'''bold'''or''italic''by placing it between'apostrophes. -
[[Links]]within Wikipedia are added using[[]]square brackets. - Remember to provide an edit summary when you save!
- You can create new pages using the Article wizard, as long as the topic is notable, has reliable sources, and isn't a conflict of interest.
Detailed information

- Help:Editing
- Help:Cheatsheet
- Help:Wikilinks
- Help:Edit summary
- Help:Watchlist
- Help:A quick guide to templates
- Wikipedia:Manual of Style
- Help:Your first article
![A cartoon of a political rally, with someone in the crowd holding up a banner reading "[Citation needed]"](http://upload.wikimedia.org/wikipedia/commons/thumb/a/aa/Webcomic_xkcd_-_Wikipedian_protester_-_English.svg/260px-Webcomic_xkcd_-_Wikipedian_protester_-_English.svg.png)
One of the key policies of Wikipedia is that all article content has to be verifiable. This means that reliable sources must be able to support the material. All quotations, any material whose verifiability has been challenged or is likely to be challenged, and contentious material (whether negative, positive, or neutral) about living persons must include an inline citation to a source that directly supports the material. This also means that Wikipedia is not the place for original work, archival findings that have not been published, or evidence from any source that has not been published. An example of usage in a published source is not of itself valid as a citation, because your selection of that example constitutes original work.
If you are adding new content, it is your responsibility to add sourcing information along with it. Material provided without a source is significantly more likely to be removed from an article. Sometimes it will be tagged first with a "citation needed" template to give editors a chance to find and add sources, but some editors will simply remove it because they question its veracity.
This tutorial will show you how to add inline citations to articles, and also briefly explain what Wikipedia considers to be a reliable source.
Inline citations are usually small, numbered footnotes like this.[1] They are generally added either directly following the fact that they support, or at the end of the sentence that they support, following any punctuation. When clicked, they take the reader to a citation in a reference section near the bottom of the article.
While editing a page that uses the most common footnote style, you will see inline citations displayed between <ref>...</ref> tags.
If you are creating a new page, or adding references to a page that didn't previously have any, remember to add a References section like the one below near the end of the article:
==References==
{{reflist}}
Note: This is by far the most popular system for inline citations, but sometimes you will find other styles being used in an article. This is acceptable, and you shouldn't change it or mix styles. To add a new reference, just copy and modify an existing one.
- ^ Wales, Jimmy (2025). What is an inline citation?. Wikipublisher. p. 6.

Manually adding references can be a slow and tricky process. Fortunately, there is a tool called "RefToolbar" built into the Wikipedia edit window, which makes it much easier.
To use it, click on ![]() Cite at the top of the edit window, having already positioned your cursor after the sentence or fact you wish to reference. Then select one of the 'Templates' from the dropdown menu that best suits the type of source. These are:
Cite at the top of the edit window, having already positioned your cursor after the sentence or fact you wish to reference. Then select one of the 'Templates' from the dropdown menu that best suits the type of source. These are:
{{cite web}}for references to general websites{{cite news}}for newspapers and news websites{{cite book}}for references to books{{cite journal}}for magazines, academic journals, and papers
A template window then pops up, where you fill in as much information as possible about the source, and give a unique name for it in the "Ref name" field. Click the "Insert" button, which will add the required wikitext in the edit window. If you wish, you can also "Preview" how your reference will look first.
Some fields (such as a web address, also known as a URL) will have a ![]() icon next to them. After filling in this field, you can click it to handily autofill the remaining fields. It doesn't always work properly, though, so be sure to double check it.
icon next to them. After filling in this field, you can click it to handily autofill the remaining fields. It doesn't always work properly, though, so be sure to double check it.
Often, you will want to use the same source more than once in an article to support multiple facts. In this case, you can click Named references ![]() in the toolbar, and select a previously added source to re-use.
in the toolbar, and select a previously added source to re-use.

Wikipedia articles require reliable, published sources that directly support the information presented in the article. Now you know how to add sources to an article, but which sources should you use?
The word "source" in Wikipedia has three meanings: the work itself (for example, a document, article, paper, or book), the creator of the work (for example, the writer), and the publisher of the work (for example, Cambridge University Press). All three can affect reliability.

Reliable sources are those with a reputation for fact-checking and accuracy. They tend to have an editorial process with multiple people scrutinizing work before it is published. Academic and peer-reviewed publications are usually the most reliable sources. Other reliable sources include university textbooks, books published by respected publishing houses, magazines, journals, and news coverage (not opinions) from mainstream newspapers.
Self-published media, where the author and publisher are the same, are usually not acceptable as sources. These can include newsletters, personal websites, press releases, patents, open wikis, personal or group blogs, and tweets. However, if an author is an established expert with a previous record of third-party publications on a topic, their self-published work may be considered reliable for that particular topic.
Whether a source is usable also depends on context. Sources that are reliable for some material are not reliable for other material. For instance, otherwise unreliable self-published sources are usually acceptable to support uncontroversial information about the source's author. You should always try to use the best possible source, particularly when writing about living people.
These are general guidelines, but the topic of reliable sources is a complicated one, and is impossible to fully cover here. You can find more information at Wikipedia:Verifiability and at Wikipedia:Reliable sources. There is also a list of commonly used sources with information on their reliability.
Summary
- All article content must be verifiable, that is, possible to support with a reliable, published source.
- All quotations, any material whose verifiability has been challenged or is likely to be challenged, and contentious material, whether negative, positive, or neutral, about living persons, must include an inline citation.
- Inline citations are added between
<ref>...</ref>tags, after the facts they support. - A
{{Reflist}}template should be added at the end of the article, in a "References" section, for the inline citations to display properly. - The RefToolbar can be used to make adding citations easier, by clicking "Cite" in the toolbar at the top of the edit window.
- Wikipedia articles require citations to reliable, published sources, with a reputation for fact-checking and accuracy.
Detailed information

- Wikipedia:Verifiability
- Wikipedia:Citing sources
- Wikipedia:Identifying reliable sources
- Wikipedia:References dos and don'ts
- Help:Citations quick reference
- Help:References and page numbers
Put what you learned into practice
There are currently over 540,452 articles that have statements that need citations. The Citation Hunt tool makes referencing those statements easier by suggesting random articles which you can work on. Practice your new skills by helping us solve a "Citation needed" issue:
To use an image (or video, or audio file) on Wikipedia, it must first be uploaded. However, there are some important restrictions on what images Wikipedia can accept. This tutorial introduces you to the relevant rules and guidelines.
To upload images, you will need to register an account. It's quick and free, and has many benefits.Hopefully, your image will be improving an article very soon!

The best place to upload most images is Wikimedia Commons, where they become part of a collection that can be used by Wikipedias in multiple languages, as well as our sister projects and the general public.
To upload images to Commons you can use the Commons Upload Wizard tool, which will guide you through the process.
There is an important caveat: Commons accepts only freely licensed images. This means that you cannot upload most images found on the internet, as the vast majority of them are not free.
However, there are some circumstances in which Wikipedia can use non-free or fair use images. This is typically when an image's presence significantly increases readers' understanding of a topic, no free alternative is available, and its use does not negatively affect the commercial interests of its owner. Examples include movie posters, corporate logos, and screenshots of web pages.
To upload a non-free image, use the File Upload Wizard, which will help you add all of the required information. A link to the wizard can be found under "Tools" at the left of the screen.

Once your image is uploaded to Commons or Wikipedia, you will probably want to use it in an article. Simply click Edit on the article you want to include the image in, then add the following where you want the image to appear:
[[File:Image name.jpg|thumb|Caption for the image]]
For example:
[[File:Durdle Door Overview.jpg|thumb|[[Durdle Door]], a [[natural arch]] near [[Lulworth Cove]]|alt=Beach with a large rocky arch over the water]]
The ![]() button also works. Notice that the caption can contain links.
button also works. Notice that the caption can contain links.
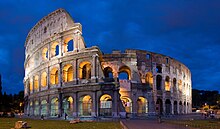
By default, images display on the right side of the article. You can place images on the left side of the article by including |left:
[[File:Colosseum in Rome, Italy - April 2007.jpg|thumb|left|The [[Colosseum]] in Rome]]
See Wikipedia:Extended image syntax for more details on adjusting the display of images, including their size.
Summary

- Images must be uploaded either to Wikipedia or to Wikimedia Commons before they can be used.
- Free images that can be reused commercially and modified are preferred.
- Non-free images may sometimes be used, but only in certain circumstances.
- Wikimedia Commons accepts only free images, which can then be used by any of the other Wikimedia projects.
- To use an image in an article, insert:
[[File:Image name.jpg|thumb|Caption for the image]].
More detailed information
- Wikipedia:Uploading images
- Wikipedia:Picture tutorial (how to add images to an article)

Tables are a common way of displaying data. This tutorial provides a guide to making new tables and editing existing ones. For guidelines on when and how to use tables, see the Manual of Style.
The easiest way to insert a new table is to use the editing toolbar that appears when you edit a page (see image above). Clicking the ![]() button will open a dialog where you define what you want in your new table. Once you've chosen the number of rows and columns, the wiki markup text for the table is inserted into the article. Then you can replace the "Example" text with the data you want to be displayed.
button will open a dialog where you define what you want in your new table. Once you've chosen the number of rows and columns, the wiki markup text for the table is inserted into the article. Then you can replace the "Example" text with the data you want to be displayed.
Tables in Wikipedia, particularly large ones, can look intimidating to edit, but the way they work is simple.
Whether you've just inserted a new table, or are editing an existing one, changing the text in the table cells determines what the table looks like to a reader. But you can do more than just change text.
A table consists of the following basic elements, all of which you can modify:
{|
|
start | Besides beginning the table, this is also where the table's class is defined – for example, class="wikitable". A table's "class" applies standard Wikipedia formatting to that table. The two most commonly used classes are "wikitable" and "wikitable sortable"; the latter allows the reader to sort the table by clicking on the header cell of any column.
|
|---|---|---|
|+
|
caption | Required for accessibility purposes on data tables, and placed only between the table start and the first table row. |
!
|
header cell | Optional. Each header cell starts with a new line and a single exclamation mark (!), or several header cells can be placed consecutively on the same line, separated by double exclamation marks (!!).
|
|-
|
new row | To begin a new row of cells, use a single vertical bar (|) and a hyphen (-).
|
|
|
new cell in row |
To add a new cell in a row, start each new cell with a new line and a single vertical bar (|), or several cells can be placed consecutively on the same line, separated by double vertical bars (||).
|
|}
|
end | To end the table, use a single vertical bar (|) and a left facing curly brace (}) alone on a new line.
|
Blank spaces at the beginning and end of a cell are ignored.
Layout
When you edit an existing table, you'll probably see one of two common ways that the table is laid out:
Data is arranged like a table
This is useful when there aren't too many columns and the cell contents are short (e.g. just numbers). This is the markup layout that the ![]() button will create.
button will create.
{| class="wikitable"
|+ Caption
|-
! Header C1 !! Header C2 !! Header C3
|-
| R1C1      || R1C2      || R1C3
|-
| R2C1      || R2C2      || R2C3
|}
Cells are arranged vertically
With lots of columns, or cells with long contents, putting each cell on a new line can improve readability of the markup.
{| class="wikitable"
|+ Caption
|-
! Header C1
! Header C2
! Header C3
|-
| R1C1
| R1C2
| R1C3
|-
| R2C1
| R2C2
| R2C3
|}
To a reader, both of the above examples will look the same:
| Header C1 | Header C2 | Header C3 |
|---|---|---|
| R1C1 | R1C2 | R1C3 |
| R2C1 | R2C2 | R2C3 |
It is common to want to edit an existing table by adding just one extra column or row of information.
Adding a row
To add an extra row into a table, you'll need to insert an extra row break and the same number of new cells as are in the other rows.
The easiest way to do this in practice, is to duplicate an existing row by copying and pasting the markup. It's then just a matter of editing the cell contents. Make sure that you preserve the end of table markup, |}, below the last row of the table.
Adding a column
To add an extra column to a table, you'll need to add a single extra cell in the same position to each row.
Preview your changes
Previewing your edits is especially important for tables; it is easy to make a minor error that breaks table formatting.
Summary
- Tables can be inserted using the
 button.
 - Standard tables begin with
{|class="wikitable"and end with|}. - Sortable tables instead begin with
{|class="wikitable sortable". - Each row of a table starts with
|-. - Cells in a row are separated by
||pipe characters.
Detailed information

- Help:Table: the main table help page
- Help:HTML in wikitext § Tables
If you have a question, concern, or comment related to improving a Wikipedia article, you can put a note on that article's talk page.

You get to the talk page by clicking the "Talk" tab at the top of the article. If the tab shows up in red, it just means no one has commented yet; feel free to start a discussion.
When you start a new discussion topic, put it at the bottom of the talk page. The best way to do this is by clicking the "Add topic" tab at the top of the page. This allows you to enter a new section heading and your comments.
If you are responding to someone else's remarks, put your comment below theirs. You can do this by clicking on the Reply link after their comment. Link to pages you mention with the ![]() icon and mention other editors with the
icon and mention other editors with the ![]() icon.
icon.
Your comments will be signed with your IP address (a number representing your internet connection)username and a link to your personal talk page, along with the time you saved the page. If you create an account, your username will become your signature and you will be able to customize its appearanceIf you want, you can customize the appearance of your signature.
Everyone contributing to Wikipedia has their own user talk page. On this page, anyone can leave a message for you. People can ask you questions or give you advice. There are also some automated "bots" that can add helpful messages.
Unregistered users on a shared internet connection, like school or home networks, get a shared talk page. If someone leaves you a message, you'll see a notification at the top of whichever page you're looking at: When you receive a message, you'll get a notification at the top of your screen:
You can reply the same way you would at an article talk page: click the Reply link after their comment and mention them with the ![]() icon to notify them.
icon to notify them.

Generally, you can find an editor's user talk page by following the link labelled "talk" in their signature, located at the end of their messages. You can always reach their user talk page by clicking on their name in the signature, and then clicking on the "Talk" tab, as you would with an article. You can also reach another editor's talk page by typing "User talk:" and the name of the user in the search bar.
Not all talk pages are monitored by other editors. This is particularly true for more obscure topics, which often have less well-developed articles and can go years without human activity on their talk page.
If you want to edit a more obscure article and feel confident, just be bold and do so. However, if you'd like to discuss a potential change first to get a second opinion or seek help, you can start a discussion on the talk page and then share a notice about it on a more popular page.
To do this, first check out any associated WikiProjects listed at the top of the article's talk page. If they seem active, post an invitation to their talk page to join the discussion. You can use {{subst:Please see|Talk:Page name#Section name}} to do this or just write it out, but do not start the same discussion in multiple places. If none of the projects seem active or no one replies, you can also ask for help at the Teahouse.
Talk pages are used for many different types of discussions, including proposed mergers, splits, and moves (title changes). Some discussions are held at noticeboards, such as the village pumps or Articles for deletion (AfD).
Summary

- You discuss an article on its talk page. Place new comments under older comments.
- You also have a user talk page where people can leave you messages.
Try it!
Go to the list of most recent talk page edits and click on a page. Check out the conversation there, and contribute to it if you have something to say!
More detailed information
This should be enough to get you started. If you need more detailed information, check out Help:Using talk pages.
Help:Introduction to talk pages/5
VisualEditor 23 pages
A note about editing on mobile devices: Most Wikipedians prefer to edit from a computer, as the editing interface works better there. You can edit from a mobile device, though. See this page for more information.

VisualEditor is a What You See Is What You Get-style editor for Wikipedia. It's very simple to learn. It is an alternative to the Source editor, the primary editing interface which works more like a plain text file and allows you to directly edit the wiki markup text (wikitext). While VisualEditor is simpler to use, the Source editor can be more effective for some tasks.
This tutorial introduces the basics of using VisualEditor. Full instructions can be found in the VisualEditor user guide. You can enable VisualEditor through the Editing tab of Preferences: At "Editing mode:" select the dropdown "Show me both editing tabs". Then, ensure the "Temporarily disable the visual editor while it is in beta" box is not checked, and simply save your settings.
VisualEditor is still in development and so has some limitations and bugs. Most notably, it is slower to load than editing the source code, and is available for article pages but not talk pages. If you spot any problems, you can leave comments and suggestions at the Feedback page.
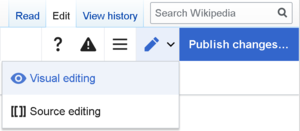
Opening VisualEditor
After you've enabled VisualEditor, you can edit any page that uses it by clicking on the "Edit" tab at the top of the page. (A long page may take a few seconds to load.)
You can also open VisualEditor by clicking on the "edit" link on any section of an article. You can also toggle between using VisualEditor and Source Editor whilst editing most pages.

The VisualEditor toolbar appears at the top of the screen when you begin editing.
The ![]() buttons Undo and Redo the changes you have made.
buttons Undo and Redo the changes you have made.
The Paragraph ![]() or Headings
or Headings ![]() drop-down menu allows you to use standard text formats, for example to create headings and subheadings. Normal text format is called "Paragraph"; the main page sections are called "Heading", and subheadings are "Heading 2", "Heading 3", etc.
drop-down menu allows you to use standard text formats, for example to create headings and subheadings. Normal text format is called "Paragraph"; the main page sections are called "Heading", and subheadings are "Heading 2", "Heading 3", etc.
The A ![]() drop down menu contains additional formatting options including bold (B), italic (I), underline (U), superscript (x2), and subscript (x2).This formatting is applied to any text that you've selected. For example, an article's subject should be written in bold the first time it is mentioned.
drop down menu contains additional formatting options including bold (B), italic (I), underline (U), superscript (x2), and subscript (x2).This formatting is applied to any text that you've selected. For example, an article's subject should be written in bold the first time it is mentioned.
The ![]()
![]() allows bulleted and numbered lists, and the Ω menu contains special characters.
allows bulleted and numbered lists, and the Ω menu contains special characters.

Links (particularly wikilinks) are one of the key components of Wikipedia. A wikilink connects to another page on the encyclopedia and ties the whole thing together.
In general, wikilinks should be added for the first occurrence of important concepts for the topic that are not commonly used English words or major countries/cities. Links can be added through the ![]() menu, or by using the shortcut Ctrl+K.
menu, or by using the shortcut Ctrl+K.

Using the linking menu or shortcut creates a dialog box that allows you to search for relevant internal links within Wikipedia. Pressing ↵ Enter or the "Done" button causes the link to appear on the VisualEditor page.
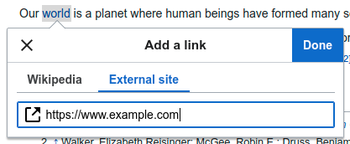
External links (to other websites) can be created using the "External site" tab, and entering a URL in the box. In articles, this is generally appropriate only in the External links section, at the bottom of the page. (To insert a URL as a supporting reference in an article, see the references tutorial)
To edit or remove a link already on a page, just click on the link.

Once you're happy with your changes, it's time to publish them (the same as saving). When you publish your edits, they immediately change the Wikipedia page you were editing. To cancel your edits, just close your browser window without clicking 'Publish changes'.
When you're done editing, click the blue Publish changes button in the toolbar. This will open a dialog box where you should summarise your edits. This summary helps other editors understand what you've changed, and why.

If you just made uncontroversial spelling or formatting changes, marking your editing as minor can be helpful to other editors (this option isn't available unless you're logged in). Also, if you want to be notified of further changes to the page, you can add it to your Watchlist (again, only available to those who are logged in).
The Review your changes button shows you the Wiki markup source code for the changes you've made, if you want to check. The Resume editing button returns you to the page you were editing, where you can make more changes (you can publish all of your edits later).

Wikipedia already has 7 million articles, so most of the time you'll likely be updating and improving existing pages. Sometimes, however, you may want to create a completely new article! Before you do so, there are three criteria you need to know:
Notability
Is the topic notable? Topics need to be sufficiently important to be included in Wikipedia. This means that the subject must have received significant coverage in reliable sources that are independent of the subject, such as newspapers, magazines, scholarly journal articles, and books.
Reliable sources
Are there reliable and verifiable sources to back up any claims? Before you start writing an article, you should gather a set of independent, reliable, verifiable sources to cite as references. These are essential for ensuring that the contents of Wikipedia remain accurate, verifiable, and trustworthy.
Conflicts of interest
Do you have a conflict of interest (COI)? It is best to avoid writing articles about yourself, your company, or someone you know personally. This is because it is difficult to avoid bias and achieve a neutral point of view on these topics. Even if you cannot write the article yourself, you can always request that someone else write it and provide them with reliable sources to use.
Where to create a new page
It is typically best to create a new article as a Draft (e.g. "Draft:Example"). This allows you to write and develop your article before it gets moved to Wikipedia's mainspace.
|
|
The Article Creation Wizard will walk you through the steps of creating a new draft article and notify experienced editors to review the article and provide feedback. |
Summary

- When enabled, VisualEditor is activated by clicking "Edit" at the top of an article
- The toolbar has functions similar to a standard word processing program
- Standard formatting for headings is accessed via the Paragraph
 drop-down menu
 - Links to other Wikipedia pages, and to external web pages, are added using the
 button
 - Remember to summarise the edits you made before you save them!
- Your changes are made to a Wikipedia page when you press Publish changes
- You can create new pages using the Article wizard, so long as the topic is notable, has reliable sources, and isn't a conflict of interest
More detailed information
- Help:Wikilinks
- Help:Edit summary
- Help:Watchlist
- Wikipedia:Manual of Style
- Wikipedia:Your first article
![A cartoon of a political rally, with someone in the crowd holding up a banner reading "[Citation needed]"](http://upload.wikimedia.org/wikipedia/commons/thumb/a/aa/Webcomic_xkcd_-_Wikipedian_protester_-_English.svg/260px-Webcomic_xkcd_-_Wikipedian_protester_-_English.svg.png)
One of the key policies of Wikipedia is that all article content has to be verifiable. This means that reliable sources must be able to support the material. All quotations, any material whose verifiability has been challenged or is likely to be challenged, and contentious material (whether negative, positive, or neutral) about living persons must include an inline citation to a source that directly supports the material. This also means that Wikipedia is not the place for original work, archival findings that have not been published, or evidence from any source that has not been published. An example of usage in a published source is not of itself valid as a citation, because your selection of that example constitutes original work.
If you are adding new content, it is your responsibility to add sourcing information along with it. Material provided without a source is significantly more likely to be removed from an article. Sometimes it will be tagged first with a "citation needed" template to give editors a chance to find and add sources, but some editors will simply remove it because they question its veracity.
This tutorial will show you how to add inline citations to articles, and also briefly explain what Wikipedia considers to be a reliable source.
To insert a reference, first activate VisualEditor by clicking "edit" at the top of an article. Once the toolbar has appeared, click where you wish to insert the reference. Clicking the ![]() button will open up a dialog box that allows you to enter the details of your reference.
button will open up a dialog box that allows you to enter the details of your reference.
There are two simple ways to create a new reference: Fully automatic (by just inserting a web URL) or manually by filling in a template (where you add each piece of information separately).

The automatic option is the easiest. Wikipedia can often auto-format a reference citation if you just insert the website URL and click "Generate". Take a look at the citation that it then creates. To accept it, click "Insert". You can then modify the details, if VE has got something wrong, such as the publication date, by clicking "Edit".

To enter the information about a reference manually, click the "Manual" tab of the dialog box. Then you select which type of reference you want to add, and fill in as many of the fields ("parameters") as possible.
Sometimes the reference you want to add doesn't fall into any of these categories (for example, perhaps you want to cite a speech). In this case, you can enter the information fully manually using the "Basic form". (These types of references are currently easier using Wiki markup citations.)

To edit an existing reference, click on the [number] where it appears in the text. You will see either a ![]() "Reference icon", or the icon (and name) for the template that was used to create this reference. Clicking the "Edit" button opens a "template mini-editor" dialog where you can edit the information for that reference.
"Reference icon", or the icon (and name) for the template that was used to create this reference. Clicking the "Edit" button opens a "template mini-editor" dialog where you can edit the information for that reference.
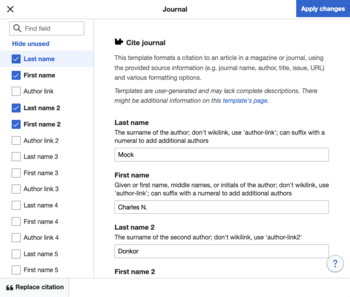
Inside the template mini-editor, you change the information in fields by typing in the boxes.
To add a new piece of information (for example, the publication date), select it in the left column.
When you're done editing the reference, click "Apply changes". Remember, you'll still need to then save your changes!

Sometimes you may want to cite the same reference in multiple places on a page.
To do so, click the ![]() button, and select the "Re-use" tab. This will display a list of all the references currently used in the article.
button, and select the "Re-use" tab. This will display a list of all the references currently used in the article.
To find the reference you want to re-use, either scroll through the list, or use the "Search within current citations" bar at the top. Clicking on a specific reference will insert it into the article.

Wikipedia articles require reliable, published sources that directly support the information presented in the article. Now you know how to add sources to an article, but which sources should you use?
The word "source" in Wikipedia has three meanings: the work itself (for example, a document, article, paper, or book), the creator of the work (for example, the writer), and the publisher of the work (for example, Cambridge University Press). All three can affect reliability.

Reliable sources are those with a reputation for fact-checking and accuracy. They tend to have an editorial process with multiple people scrutinizing work before it is published. Academic and peer-reviewed publications are usually the most reliable sources. Other reliable sources include university textbooks, books published by respected publishing houses, magazines, journals, and news coverage (not opinions) from mainstream newspapers.
Self-published media, where the author and publisher are the same, are usually not acceptable as sources. These can include newsletters, personal websites, press releases, patents, open wikis, personal or group blogs, and tweets. However, if an author is an established expert with a previous record of third-party publications on a topic, their self-published work may be considered reliable for that particular topic.
Whether a source is usable also depends on context. Sources that are reliable for some material are not reliable for other material. For instance, otherwise unreliable self-published sources are usually acceptable to support uncontroversial information about the source's author. You should always try to use the best possible source, particularly when writing about living people.
These are general guidelines, but the topic of reliable sources is a complicated one, and is impossible to fully cover here. You can find more information at Wikipedia:Verifiability and at Wikipedia:Reliable sources. There is also a list of commonly used sources with information on their reliability.
Summary
- Information in articles needs to have references that show where that information came from.
- Verifiable - other users must be able to check the information
- Reliable sources - with a reputation for fact-checking and accuracy
- Clicking the
 button opens a dialog box that allows you to:
- Cite a new reference
- Edit an existing reference
- Reuse the same reference in several places
More detailed information

- Wikipedia:Verifiability
- Wikipedia:Citing sources
- Wikipedia:Identifying reliable sources
- Help:Citations quick reference
- Wikipedia:References dos and don'ts
- Help:References and page numbers
- Wikipedia:Parenthetical referencing
Put what you learned into practice
There are currently over 540,452 articles that have statements that need citations. The Citation Hunt tool makes referencing those statements easier by suggesting random articles which you can work on. Practice your new skills by helping us solve a "Citation needed" issue:

Inserting a new image can be done while you're editing the article. You can either insert images that are already stored on Wikimedia Commons, or upload a new image of yours. Images are stored on Wikimedia Commons so that they can be used in multiple articles, across many languages, and are even free for anyone to use outside of Wikipedia (with some conditions). This tutorial introduces you to the process of uploading and inserting images, including the relevant rules and guidelines.


Wikimedia Commons stores images so that they can be used on different language versions of Wikipedia, as well as by sister projects of Wikipedia.
To upload a new image, first activate VisualEditor by clicking "edit" at the top of an article.
Once the VE toolbar has appeared, click the Insert ![]() menu and choose the "Images and media" option. That opens a dialog box which allows you to upload and use images.
menu and choose the "Images and media" option. That opens a dialog box which allows you to upload and use images.

Click the "Upload" tab and select an image on your computer (either type the file name or drag an image into the box).
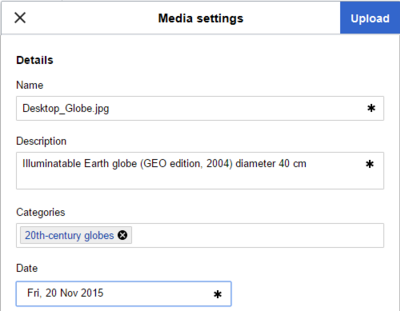
You need to add a description so that someone else who might want to use the image on another page can understand what the image is about. This description can be more detailed than you'd use in an article because it's just stored with the image on the Commons. You can also assign categories to the image, to help people find it.
Clicking "Save" will upload your new image onto the Commons and then insert it into the article!
Important caveat: Images on Wikimedia Commons must not be copyrighted by anyone other than the uploader, and when they are uploaded they become free for anyone to use when attributed (Creative commons license). If you don't own the copyright for the image, but believe that uploading it would be 'fair-use', the image should instead be stored on Wikipedia using the File Upload Wizard, not on the Commons. For more information, see Help:Introduction to images with Wiki Markup.

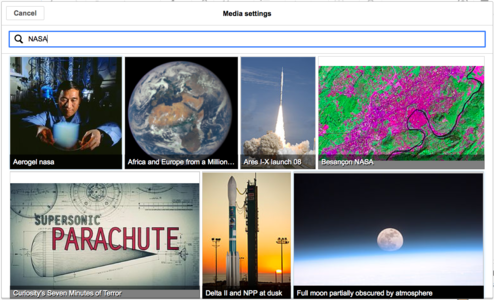
The Wikimedia Commons has millions of images. To insert one of these image into a Wikipedia article, first click the section of page where you want the image to be placed.
Next, click the Insert ![]() menu and choose the "Images and media" option to open a dialog box.
menu and choose the "Images and media" option to open a dialog box.
You can search for a suitable image by typing in the dialog box. It displays an initial set of suggested images from the Commons.
Once you see the name of a file you want, click on its thumbnail image. This places the image onto the page you are editing. You can then drag the image to change where it's placed on the page.
When you insert a new image, or double-click on an existing image in an article, a dialog box will open, where you can add details about the image and change its settings.
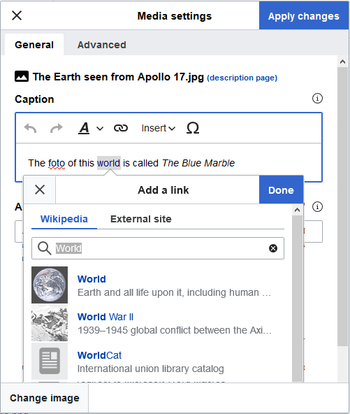
A good caption explains the image so that readers understand what they're looking at. Captions can contain wikilinks and formatting, just like the main text of a page.
Alternative text is used to describe the contents of an image for users who have visual impairments, and use a text reader for web pages.

The "Advanced settings" window contains various additional parameters. These include the alignment, the display type, and size of the image. It is usually best to leave the defaults as is, but sometimes a larger image may be more useful.

Images are usually located throughout an article, individually, near the text that is relevant to the image. In some circumstances, however, a gallery of many images together may be appropriate if the collection illustrates aspects of a subject better than individual images can.
You can edit existing galleries by clicking that gallery and selecting the gallery icon that appears by it. To add a new gallery, click the Insert ![]() menu and choose the "Gallery" option.
menu and choose the "Gallery" option.

The gallery editor has two tabs, one to add images and their captions, the other controls display options.
The order of images can be rearranged by dragging the images on the left, and more can be added using the "Add new image" button at the bottom of the list.
The options tab allows size and layout to be edited. The default display options are preferred in most cases.
Summary

- Images are stored on Wikimedia Commons so that they can be used by all languages versions and sister projects of Wikipedia
- Images to be uploaded to the Commons must be free to be reused by anyone
- Non-free images may be stored on Wikipedia's servers, but only in certain circumstances and only if a free equivalent is not possible
- The Insert
 menu's "Media" option in the VisualEditor toolbar allows you to upload new images and insert existing ones
- You should describe each new images with a caption and with alternative text so that readers can understand them
- Sets of images can be inserted as a "gallery" if individual images are insufficient
More detailed information
- Wikipedia:Uploading images
- Wikipedia:Picture tutorial (how to add images to an article)
Tables are a common way of displaying data. This tutorial provides a guide on making new tables and editing existing ones. For guidelines on when and how to use tables, see the Manual of Style.
This tutorial will introduce the basics of inserting, editing and formatting tables of information. Some advanced features, such as colouring cells, are not yet available with VisualEditor and have to be edited using Wiki Markup.

To edit the contents of an existing table in VisualEditor, simply double-click on a cell. You can then change the text, links and references, just like anywhere else in the article.
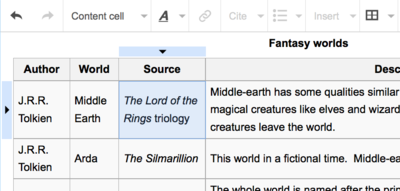
To format a cell, just click once to select it. You can then use the Content cell ![]() menu to designate it as a header.
menu to designate it as a header.
The A ![]() menu also allows you to make cells bold or italic.
menu also allows you to make cells bold or italic.
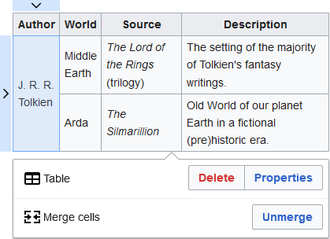
Finally, you can merge cells, by selecting a set of cells, then clicking the ![]()
![]() menu and selecting "merge".
menu and selecting "merge".
Insert a blank table

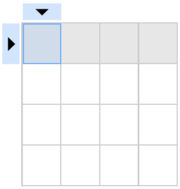
To add a new, blank table, go to the Insert ![]() menu and select the "Table" option.
menu and select the "Table" option.
Once you've chosen the number of rows and columns, it will be inserted into the article so that you can add in the contents for each cell.
Pressing Tab ↹ will select the cell to the right.
Pressing ↵ Enter will select the cell below.
Insert a table of information
Alternatively, you can copy the cells of any spreadsheet (e.g. Excel) and paste them into the editing area.

Similarly, you can import an entire existing table by dragging a comma-separated value (.csv) file from your computer into the editing window.

To add a column or row, you need to define where you want to insert it. Once you've selected a cell, a triangle will appear at the top of the column, and the left of the row.
Clicking on the top triangle allows you to add a new column before or after the selected one (or delete it). Similarly, clicking the left triangle allows you to add or remove rows.
Summary
- The contents of existing tables can be edited by double-clicking on the cells
- Columns and rows can be added or moved by clicking the triangle at the top of a column or left of a row
- Blank tables can be inserted with the Insert
 menu
menu
- Tables of data can be inserted by copy-pasting the contents of a spreadsheet, or dragging and dropping a csv file
- Cells can be formatted with the Content cell
 and A
and A  menus
menus
More detailed information

- Help:tables - the main help page
- Help:HTML in wikitext § Tables
Navigation 6 pages

Wikipedia is a big place!
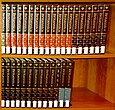
For a start, there are currently 7 million articles, the most extensive encyclopedia in human history. If we printed them all out, they would take up about 3,602 volumes, which would look something like this.
In addition to this, there are another 55.6 million supporting pages devoted to helping build the project.
This tutorial will help you to get your bearings, teach you how to find what you're looking for, and introduce you to a few of the most important pages.
Wikipedia's pages are divided into namespaces. Each namespace (except the main article space) has a prefix that is followed by a colon at the start of page names. Here are some of the namespaces you might encounter, along with an explanation and examples:
| Namespace | Purpose | Example(s) |
|---|---|---|
| Main/article no prefix |
Articles | Starfish |
| Disambiguation pages to help people find the article they're looking for | David (disambiguation) | |
| Wikipedia: a.k.a. "Project" |
Policies and guidelines | Wikipedia:Neutral point of view Wikipedia:Manual of Style |
| Process pages | Wikipedia:Articles for Creation | |
| Discussion forums and noticeboards | Wikipedia:Village pump | |
| WikiProject communities focusing on a particular topic | Wikipedia:WikiProject History | |
| User: | Personal profile pages about users | User:Jimbo Wales |
| Sandboxes and personal draft articles | User:Example/sandbox | |
| Draft: | Draft articles that are in progress | Draft:Exampledraft |
| Help: | Help pages | Help:Contents |
| Template: | Templates, which can be included or substituted on other pages | Template:Citation needed Template:Infobox album |
| Category: | Groups of pages organized by their similarities | Category:Painting Category:Wikipedia maintenance |
| File: | Images and other files, stored and described | File:Wiki.png |
| Portal: | Pages to highlight Wikipedia content in a particular topic area | Portal:Current events Portal:Solar System |
| Special: | Pages that are part of the software | Special:RecentChanges Special:Preferences |

Each page in each of these namespaces, except for Special, also has a corresponding Talk page for discussion. So, for example, you can discuss the starfish article at Talk:Starfish, or talk about Wikipedia:Neutral point of view at Wikipedia talk:Neutral point of view. You can switch between the normal page and the talk page by clicking the tabs at the top left.

The search box is at the top of every page. Start typing, and it will begin to suggest pages you might be looking for — you can click on one to go directly to that page. Alternatively, if you type in a complete page title and hit ↵ Enter, you'll be taken straight to that page.
If you type a word or phrase that isn't an article title and hit ↵ Enter, you will see a full search page, which lists articles where your search term occurs. You can also reach this page by clicking the magnifying glass, or by typing something into the search box, then clicking the "containing..." link at the bottom of the list of suggestions. For example, you might do this if you wanted to search for occurrences of the word "Fish" across Wikipedia, rather than be taken straight to the article Fish.

The search page also allows you to select which namespaces to search in. You can choose a preset option (Default, Discussion, General Help, or All) or add/remove namespaces individually.
Categories
| organisms | ||
|---|---|---|
| / animals |
\ plants | |
| / dogs |
\ cats | |
Another useful way to find pages is by browsing categories grouping related pages, which are listed at the bottom of a page. They form hierarchy trees from generalized topics to more specific ones, so pages should have only the most specific applicable categories. For instance, do not add [[Category:Musicians]] to an article already categorized under [[Category:Irish musicians]].
Every edit made to Wikipedia is recorded and (with rare exceptions) is publicly viewable in a page's history.

To access it, click the "View history" tab at the top of the article.
Page histories consist of rows, each representing a past revision of the page. Each line contains various elements with information or tools related to that revision:
To see the difference between two revisions, adjust the radio buttons and then click Compare selected revisions.
Redirects

Some pages on Wikipedia are redirects — they don't have any content of their own, but just send you on to another page. For example UK is a redirect to United Kingdom. So, if you type UK in the search box, it will take you directly to the article on the United Kingdom. (There will also be a note below the article title saying "Redirected from UK".)
To create a redirect to a page:
- Via wiki markup: Click the
 button and type the destination page or use the code
 #REDIRECT [[Destination]]. - Via VisualEditor: Use the

 menu and then click
  Page settings to choose a destination page.
Shortcuts
Wikipedians often refer to internal Wikipedia pages by shortcut names to make typing quicker. The Wikipedia namespace prefix can also be further abbreviated as WP:. These shortcut pages are just redirects to the target page.
For example, Wikipedia:Neutral point of view can be written as WP:NPOV to link to it, or typed into the search bar. Shortcuts to a page are usually listed in a box in the top right of that page.
At the top
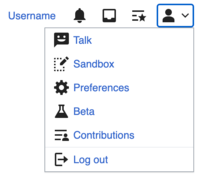
If you are logged in, you'll also see some useful links at the top right of your screen:
- Your username takes you to your userpage, where you can add information about yourself.
- Watchlist (
 ) shows recent changes to pages you're watching (click the star at the top right of a page to watch it).
 - Talk is your user talk page, where people can leave messages for you.
- Sandbox is a page in your user space where you can experiment with editing without worrying that you will cause problems on an actual Wikipedia page.
- Preferences allows you to change your password and customize your email and wiki software settings.
- Contributions has a list of all the edits you have made.
- Log out logs you out of your account.
On the left
There's an additional set of useful links on the left side of each page:
- Help is the entry point for Wikipedia's help pages.
- Community portal is the hub for editors, with news, discussions, and ways to help out.
- What links here shows you what other pages are linking to an article.
- Related changes lists any edits that have been made to pages that an article links to.
Yet more useful links
There are a few other pages on Wikipedia that are really handy to know about:
- You can ask questions at either the Help desk (using or editing Wikipedia) or the Teahouse (help for newcomers).
- The Village pump is a set of central discussion forums.
- The Task Center lists various tasks you can help out with.
- The Signpost is Wikipedia's community-written newspaper, a good way to keep up with goings-on.
Manual of Style 6 pages
The Manual of Style (MoS or MOS) is an in-depth guide that provides standards on how to format Wikipedia articles. Following these guidelines helps keep the encyclopedia clear, consistent, and stable.
The simplest way to do this is to find a well-written article and copy its formatting. But if you want more information on any formatting, the MoS probably has a recommendation (you can search its contents here).
Remember, the MoS is a guideline; you don't need to have the whole thing memorized! It's there to assist you when you're unsure how to best display information, and to minimize arguments if another editor disagrees with your formatting choices.
Content is more important than formatting, and other editors can assist you if you're in doubt (similarly, assume good faith when others help by formatting your writing).

An article should start with a simple summary of the topic, then lead the reader into more detail, breaking up the text into manageable sections with logical headings.
The lead
The lead section is the very first part of an article, appearing before the table of contents and any headings. The first sentence of the lead typically contains a concise definition and establishes the topic's notability. The rest of the lead should introduce the article's context and summarise its key points.
The lead section should be one to four paragraphs long and stand alone as a concise overview of the article. The emphasis given to each statement in the lead should roughly reflect its relative importance to the topic. Statements should be carefully sourced if covering material not sourced elsewhere in the article, and should be written in a clear, accessible style to encourage a reading of the full article. The rest of the article's prose will give detail for readers who want more information.
Sections and headings
Articles are organised into sections and subsections, each with a short heading that will automatically appear in the table of contents. In general, sections that are one to four paragraphs long are the most readable.
Headings normally omit an initial "the" or "a", and avoid repeating the title of the article. Typically only the first word in a heading is capitalised (sentence case).
Heading 1 is the article's title and is automatically generated. The section headings in the article start at the second level (==Heading 2==), with subsections at the third level (===Heading 3===), and so on. Sections should not skip levels from sections to sub-subsections (e.g., a fourth-level subsection heading immediately after a second-level heading).
- See also
- Introduction to formatting (Wiki markup)
- Introduction to formatting (VisualEditor)
- Manual of Style (Accessibility)
Images should support the body of an article without overwhelming it, and references should be provided for information that is controversial or likely to be challenged.
Images
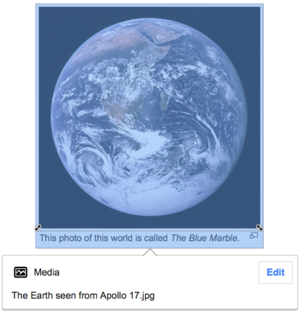
Images help readers to understand an article, not merely decorate it. Add or replace images only if they are better than the existing ones or further support the text of the article. When creating and uploading an image, it should be of sufficiently high resolution and in an appropriate file format.
Images should be spread evenly through an article, be relevant to the sections in which the images are displayed, and include an explanatory caption. Images are shown as small thumbnails and aligned to the right of the article by default, to maintain the visual coherence of the page. If necessary, other formats are possible, e.g. left-aligned, galleries, and panoramas.
Avoid stacking too many images in a short section: they can overflow into the next section and reduce readability.
- See also
- Introduction to images (Wiki markup)
- Introduction to images (VisualEditor)
- Wikipedia:Manual of Style/Images (more detailed guidance)
Citing

- Don't overuse quotations from sources; articles should generally paraphrase and summarise what sources say about a topic.
- Use reliable sources of information.
- Use the article's existing reference style, with a reference list at bottom of the article.
Sources should be cited when adding material that is controversial or likely to be challenged, when quoting someone, when adding material to the biography of a living person, and when uploading an image. While you should try to format citations correctly, the important thing is to include enough information for a reader to identify the source; others can improve the formatting if needed.
Just as with images, there's a default referencing style, but sometimes an alternative format is used. When adding new references, use the same style that is already used in the article, or seek consensus on the talk page before changing it. Inline references that you insert into the article will automatically be added to the "References" section at the end of the article (which should be placed below the "See also" section and above the "External links" section if either or both are present).
- See also
Links

Linking with hyperlinks is an important feature of Wikipedia. Internal links (or "wikilinks") bind the project together into an interconnected whole. Links provide instant pathways to locations within the project that are likely to increase our readers' understanding of the topic at hand. You learned how to add them during the Editing section of this tutorial.
To determine how many internal links to include in an article, ask yourself, "Would a reader of this subject be interested in that other article? Does it help explain a concept that is only briefly described in this article, or that may be unfamiliar to a reader?". Typically, the first instance (but not subsequent instances) of an important word should be linked to the relevant article on that topic. Take care not to include too many links, which detracts from readability.
External links (to websites other than Wikipedia) can be added in the "External links" section, along with a short description. These should be included only if they are highly relevant or provide more detail than the article has space for. Websites used as references to support the article's content should instead be put in the "References" section.
- See also
- Introduction to linking (Wiki markup)
- Introduction to linking (VisualEditor)
- Wikipedia:Manual of Style/Linking (more detailed guidance)
The MoS contains extensive guidelines on all manner of stylistic points. Below are a sample of the sorts of things you can search for advice on.
Language
The English Wikipedia prefers no major national variety of the language over any other. These varieties (e.g. US English, British English) differ in vocabulary (soccer vs. football), spelling (center vs. centre), and occasionally grammar. For consistency, only one variety should be used in a given article.
Avoid words like I, we, and you, except in quotations and names of works.
Avoid phrases like note that and remember that (which assume "you" for the reader); and avoid such expressions as of course, in fact, and obviously.
Dates and numbers
Avoid phrases that will go out of date with time (e.g. recently).
Do not write #1; number one works instead. Comic books are an exception.
Write 12,000 for twelve thousand, not 12.000; conversely, decimal points are thus: 3.14, not 3,14.
Both 10 June 1921 and June 10, 1921, are correct, but should be consistent within an article. A comma is not used if only the month is given, such as June 1921. Avoid inserting "the year" before a year, and avoid "of" in items such as "April of 2008".
400 AD and 400 BC are correct, but so are 400 CE and 400 BCE. Use one style consistently in an article.
Use one, two, three, ..., eight, nine in normal article text, not 1, 2, 3, 4, 5, 6, 7, 8, 9 (although there are many exceptional circumstances; some other numbers may also be written as words).
Capital letters
Seasons (e.g. winter) and plant/animal names (e.g. bald eagle) are not capitalized. Exceptions include scientific names (Felis catus) and proper nouns occurring as part of a name.
Names of scriptures are capitalized (e.g. Bible and Qur'an, but not biblical). Always capitalize God when it refers to a primary or only deity, but not pronouns that refer to deities: he, not He.
Abbreviations
To indicate approximately for dates, the non-italicized abbreviation c. (followed by a space) is preferred over circa, ca., or approx.
Write US or U.S., but not USA.
Use "and" instead of the "&" sign, except in tables, infoboxes, and official names like AT&T.
Punctuation
Use straight quote marks " and apostrophes ' as available from the keyboard, and not alternatives such as “ ” and ‘ ’.
Italicize names of books, films, TV series, music albums, paintings, and ships—but not short works like songs or poems, which should be in quotation marks.
Place a full stop (a period) or a comma before a closing quotation mark if it belongs as part of the quoted material (She said, "I'm feeling carefree."); otherwise, put it after (The word carefree means "happy".). Please do so irrespective of any rules associated with the variety of English in use.
The serial comma (for example the comma before and in "ham, chips, and eggs") is optional; be sensitive to possible ambiguity arising from thoughtless use or thoughtless avoidance, and be consistent within a given article.
Avoid comma splices.
Picture captions should not end in a full stop (a period) unless they are complete sentences.
Avoid using a hyphen after a standard -ly adverb (a newly available home).
A hyphen is not a dash. Hyphens are used within words or to join words, but not in punctuating the parts of a sentence. Use an en dash (–) with before, and a space after – or use an em dash (—) without spaces (see Wikipedia:How to make dashes). Avoid using two hyphens (--) to make a dash, and avoid using a hyphen as a minus sign.
Use an en dash, not a hyphen, between numbers: pp. 14–21; 1953–2008. An en dash is also used to connect parallel terms: red–green colorblind; a New York–London flight. Use spaces around the en dash only if the connected terms are multi-unit dates: January 1999 – December 2000.
Non-breaking spaces
Line breaks between words can be prevented by inserting a non-breaking space instead of an ordinary space by using the code or {{nbsp}}. This avoids lines breaking in the middle of expressions such as 17 kg, AD 565, £11 billion, February 2025, 5° 24′ 21.12″ N, Boeing 747, and World War II.
| Manual of Style (MoS) |
|---|
Summary
The MoS is a great resource, but you're not expected to read the whole thing! Here are the key principles to keep in mind:
- Consistency – Keep style and formatting consistent within an article, and between articles where possible.
- Stability – Avoid changing an article from one guideline-defined style to another without a very good reason.
- Clarity – Aim to make the encyclopedia as readable as possible (e.g. wording, layout, formatting, diagrams).
- Referencing – Make sure readers are able to trace information in the encyclopedia back to reliable sources.
The full MoS contains further advice on everything from punctuation to units of measurement to trivia. You can look up advice about specific issues using the MoS search box on the right. When in doubt, copy the formatting of an existing article (ideally a featured article) on a similar subject. Although it is important to follow the MoS where possible, verifiable content is more important than formatting!
More detailed information
Conclusion 1 page
Getting help
You can search for help pages by using the prefix "Help:" in the search box or by visiting the help portal (listed in the left sidebar in desktop mode).
If you have questions, the Teahouse is a friendly space where experienced editors can help you.
Finding tasks
The Task Center provides an overview of different ways you can help out. Find one that suits you and jump in!
Learning more
These tutorials have covered everything you need to know to get started – the best way to learn now is by editing!
As you spend time here, you'll learn more about how Wikipedia functions as a community. You may want to catch up on the latest happenings in The Signpost, our newspaper. You can also browse the massive essay directory to read contributors' thoughts about every aspect of the project.
A small token
Completing this tutorial series has earned you the right to display a userbox on your user page! To add the box, just click here and then click Publish.

