Shore durometer


The Shore durometer is a device for measuring the hardness of a material, typically of polymers.[1]
Higher numbers on the scale indicate a greater resistance to indentation and thus harder materials. Lower numbers indicate less resistance and softer materials.
The term is also used to describe a material's rating on the scale, as in an object having a "'Shore durometer' of 90."
The scale was defined by Albert Ferdinand Shore, who developed a suitable device to measure hardness in the 1920s. It was neither the first hardness tester nor the first to be called a durometer (ISV duro- and -meter; attested since the 19th century), but today that name usually refers to Shore hardness; other devices use other measures, which return corresponding results, such as for Rockwell hardness.
Durometer scales
[edit]There are several scales of durometer, used for materials with different properties. The two most common scales, using slightly different measurement systems, are the ASTM D2240 type A and type D scales.
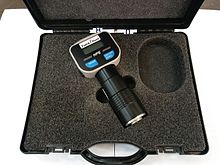
The A scale is for softer ones, while the D scale is for harder ones. The image of Bareiss digital durometer is shown in the photo.
However, the ASTM D2240-00 testing standard calls for a total of 12 scales, depending on the intended use: types A, B, C, D, DO, E, M, O, OO, OOO, OOO-S, and R. Each scale results in a value between 0 and 100, with higher values indicating a harder material.[2]
Method of measurement
[edit]
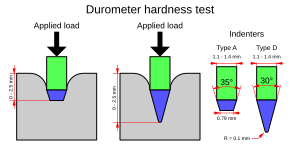
Durometer, like many other hardness tests, measures the depth of an indentation in the material created by a given force on a standardized presser foot. This depth is dependent on the hardness of the material, its viscoelastic properties, the shape of the presser foot, and the duration of the test. ASTM D2240 durometers allow for a measurement of the initial hardness, or the indentation hardness after a given period of time. The basic test requires applying the force in a consistent manner, without shock, and measuring the hardness (depth of the indentation). If a timed hardness is desired, force is applied for the required time and then read. The material under test should be a minimum of 6 mm (0.25 inches) thick.[3] Theoretical background of the test is considered in Stoßprobleme in Physik, Technik und Medizin by Grundlagen und Anwendungen[4]
| Durometer | Indenting foot | Kilogram-force (kgf) | Newton (N) |
|---|---|---|---|
| Type A | Hardened steel rod 1.1 mm – 1.4 mm diameter, with a truncated 35° cone, 0.79 mm diameter | 0.822 | 8.064 |
| Type D | Hardened steel rod 1.1 mm – 1.4 mm diameter, with a 30° conical point, 0.1 mm radius tip | 4.550 | 44.64 |
The ASTM D2240 standard recognizes twelve different durometer scales using combinations of specific spring forces and indentor configurations. These scales are properly referred to as durometer types; i.e., a durometer type is specifically designed to determine a specific scale, and the scale does not exist separately from the durometer. The table below provides details for each of these types, with the exception of Type R.[5]
| Durometer type | Configuration | Diameter | Extension | Spring force[6] |
|---|---|---|---|---|
| A | 35° truncated cone (frustum) | 1.40 mm (0.055 in) | 2.54 mm (0.100 in) | 8.05 N (821 gf) |
| B | 30° cone | 1.40 mm (0.055 in) | 2.54 mm (0.100 in) | 8.05 N (821 gf) |
| C | 35° truncated cone (frustum) | 1.40 mm (0.055 in) | 2.54 mm (0.100 in) | 44.45 N (4,533 gf) |
| D | 30° cone | 1.40 mm (0.055 in) | 2.54 mm (0.100 in) | 44.45 N (4,533 gf) |
| E | 2.5 mm (0.098 in) spherical radius | 4.50 mm (0.177 in) | 2.54 mm (0.100 in) | 8.05 N (821 gf) |
| M | 30° cone | 0.79 mm (0.031 in) | 1.25 mm (0.049 in) | 0.765 N (78.0 gf) |
| O | 1.20 mm (0.047 in) spherical radius | 2.40 mm (0.094 in) | 2.54 mm (0.100 in) | 8.05 N (821 gf) |
| OO | 1.20 mm (0.047 in) spherical radius | 2.40 mm (0.094 in) | 2.54 mm (0.100 in) | 1.111 N (113.3 gf) |
| DO | 1.20 mm (0.047 in) spherical radius | 2.40 mm (0.094 in) | 2.54 mm (0.100 in) | 44.45 N (4,533 gf) |
| OOO | 6.35 mm (0.250 in) spherical radius | 10.7–11.6 mm (0.42–0.46 in) | 2.54 mm (0.100 in) | 1.111 N (113.3 gf) |
| OOO-S | 10.7 mm (0.42 in) radius disk | 11.9 mm (0.47 in) | 5.0 mm (0.20 in) | 1.932 N (197.0 gf) |
Note: Type R is a designation, rather than a true "type". The R designation specifies a presser foot diameter (hence the R, for radius; obviously D could not be used) of 18 ± 0.5 mm (0.71 ± 0.02 in) in diameter, while the spring forces and indenter configurations remain unchanged. The R designation is applicable to any D2240 Type, with the exception of Type M; the R designation is expressed as Type xR, where x is the D2240 type, e.g., aR, dR, etc.; the R designation also mandates the employment of an operating stand.[5]
Some conditions and procedures that have to be met, according to DIN ISO 7619-1 standard are:
- For measuring Shore A the foot indents the material while for Shore D the foot penetrates the surface of the material.
- Material for testing needs to be in laboratory climate storage at least one hour before testing.
- Measuring time is 15s.
- Force is 1 kg +0.1 kg for Shore A, and 5 kg +0.5 kg for Shore D.
- Five measurements need to be taken.
- Calibration of the Durometer is one per week with elastomer blocks of different hardness.
The final value of the hardness depends on the depth of the indenter after it has been applied for 15 seconds on the material. If the indenter penetrates 2.54 mm (0.100 inch) or more into the material, the durometer is 0 for that scale. If it does not penetrate at all, then the durometer is 100 for that scale. It is for this reason that multiple scales exist. But if the hardness is <10 °Sh or >90 °Sh the results are not to be trusted. The measurement must be redone with adjacent scale type.

Durometer is a dimensionless quantity, and there is no simple relationship between a material's durometer in one scale, and its durometer in any other scale, or by any other hardness test.[1]
| Material | Durometer | Scale |
|---|---|---|
| Bicycle gel seat | 15–30 | 00 |
| Chewing gum | 20 | 00 |
| Sorbothane | 30–70 | 00 |
| Rubber band | 25 | A |
| Door seal | 55 | A |
| Automotive tire tread | 70 | A |
| Soft wheels of roller skates and skateboard | 78 | A |
| Hydraulic O-ring | 70–90 | A |
| Pneumatic O-ring | 65–75 | A |
| Hard wheels of roller skates and skateboard | 98 | A |
| Ebonite rubber | 100 | A |
| Solid truck tires | 50 | D |
| Hard hat (typically HDPE) | 75 | D |
| Cast urethane plastic | 80 | D |
ASTM D2240 hardness and elastic modulus
[edit]Using linear elastic indentation hardness, a relation between the ASTM D2240 hardness and the Young's modulus for elastomers has been derived by Gent[7].Gent's relation has the form where is the Young's modulus in MPa and is the ASTM D2240 type A hardness.
This relation gives a value of at but departs from experimental data for .
Mix and Giacomin derive comparable equations for all 12 scales that are standardized by ASTM D2240.[8]
Another relation, that fits the experimental data slightly better, is[9] where is the error function, and is in units of Pa.
To make that a little more insightful, here is a list of Shore A values with their corresponding Young's modulus (in MPa), where "MPa" is computed from "ShoreA" using first formula, and then "AltShoreA" is computed from "MPa" using second formula :
| Shore A | MPa | Alt Shore A |
|---|---|---|
| 10.0 | 0.413 | 22.776 |
| 20.0 | 0.732 | 30.011 |
| 30.0 | 1.142 | 36.989 |
| 40.0 | 1.690 | 44.191 |
| 50.0 | 2.456 | 51.986 |
| 60.0 | 3.605 | 60.772 |
| 70.0 | 5.520 | 71.024 |
| 80.0 | 9.351 | 83.175 |
| 90.0 | 20.844 | 96.032 |
A first-order estimate of the relation between ASTM D2240 type D hardness (for a conical indenter with a 15° half-cone angle) and the elastic modulus of the material being tested is[10] where is the ASTM D2240 type D hardness, and is in MPa.
Another Neo-Hookean linear relation between the ASTM D2240 hardness value and material elastic modulus has the form[10] where is the ASTM D2240 type A hardness, is the ASTM D2240 type D hardness, and is the Young's modulus in MPa.
Patents
[edit]- US patent 1770045, A. F. Shore, "Apparatus for Measuring the Hardness of Materials", issued 1930-07-08
- US patent 2421449, J. G. Zuber, "Hardness Measuring Instrument", issued 1947-06-03
See also
[edit]- Brinell hardness test – Brinell scale of hardness
- Bloom (test) – Test to measure strength of a gel
- Knoop hardness test – micro-hardening test
- Leeb Rebound Hardness Test – Method of testing metal hardness
- Rockwell hardness test – Hardness scale
- Vickers hardness test – Hardness test
References
[edit]- ^ a b "Shore (Durometer) Hardness Testing of Plastics". Retrieved 2006-07-22.
- ^ "Material Hardness". CALCE and the University of Maryland. 2001. Archived from the original on 2007-07-07. Retrieved 2006-07-22.
- ^ a b "Rubber Hardness". National Physical Laboratory, UK. 2006. Retrieved 2006-07-22.
- ^ Willert, Emanuel (2020). Stoßprobleme in Physik, Technik und Medizin: Grundlagen und Anwendungen (in German). Springer Vieweg. doi:10.1007/978-3-662-60296-6. ISBN 978-3-662-60295-9. S2CID 212954456.
- ^ a b "DuroMatters! Basic Durometer Testing Information" (PDF). CCSi, Inc. Archived from the original (PDF) on 24 March 2012. Retrieved 29 May 2011.
- ^ "Standard Test Method for Rubber Property—Durometer Hardness1". ASTM International (D2240 − 15´1): 5. November 2017. doi:10.1520/D2240-15E01.
- ^ A. N. Gent (1958), On the relation between indentation hardness and Young's modulus, Institution of Rubber Industry -- Transactions, 34, pp. 46–57. doi:10.5254/1.3542351
- ^ A. W. Mix and A. J. Giacomin (2011), Standardized Polymer Durometry, Journal of Testing and Evaluation, 39(4), pp. 1–10. doi:10.1520/JTE103205
- ^ British Standard 903 (1950, 1957), Methods of testing vulcanised rubber Part 19 (1950) and Part A7 (1957).
- ^ a b Qi, H. J., Joyce, K., Boyce, M. C. (2003), Durometer hardness and the stress-strain behavior of elastomeric materials, Rubber Chemistry and Technology, 76(2), pp. 419–435. doi:10.5254/1.3547752


